


Even as a beginner, you can attempt certain intermediate poses so long as you practice with a yoga teacher to nail down your form and properly breathe through the asanas.
Here, Rachel Hirsch, E-RYT 500, yoga teacher and founder of Empowered Yoga, shares her five go-to intermediate poses to try.
In This Article
Experts In This Article
1. The splits (Hanumanasana)
The splits are the ultimate test of flexibility, and nailing the move can help improve your mobility.
“Hanumanasana stretches your lower body, including your thighs, hamstrings, and groin,” Hirsch says. “Practicing your splits can support hip mobility and flexibility and may stimulate the digestive and reproductive organs.”
You know you’re ready to level up your Hanumanasana after spending time and gaining mobility and flexibility in your half-splits.
“Each time, going a bit deeper, you may notice it’s time to try your full splits,” Hirsch says.
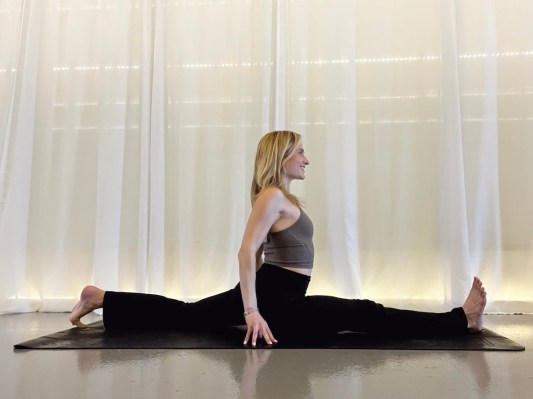
- Starting on your right side, begin by moving into a low lunge position with your right foot positioned between your hands. Ensure that your back toes are tucked to maintain square hips.
- Lower your back knee to the ground and start straightening your front leg, transitioning into a half split.
- Gradually inch your right foot forward and your left foot back. Adjust the distance as needed, aiming to fully straighten both legs. For added support and elevation, consider placing your hands on blocks. If your pelvis doesn’t reach the ground in this position, you can slide a block under your legs for additional support.
- Naturally, your hips may want to open up. To maintain alignment on the right side, focus on drawing your left hip forward while gently pulling your right hip back.
- Hold this position for five breaths, then repeat the sequence on the other side.
A variation to try: When your right leg is in front, try twisting your torso to the right. This will increase sensation—and eventually, you can take this into an arm balance, Hirsch says.
Related Stories
2. Bird of paradise (Svarga Dvijasana)
Bird of paradise strengthens your core, stretches your shoulders, and helps posture and balance improvement. (If you’re looking for more ways to work on your stability, this yoga flow for better balance can help!)
“The pose can also strengthen the muscles in your legs and ankles,” Hirsch says. “Svarga Dvijasana takes quite a bit of hamstring flexibility, external rotation in the hip, focus, and balance pose. With a thorough asana practice, you may feel ready to try Svarga Dvijasana after warming up your body and working through hip mobility, hamstring flexibility, and shoulder opening.”

- Begin in an extended side angle pose on the right side by bending your right knee and leaning your torso forward to connect your right shoulder with your right knee.
- To enter the bind, bend your right elbow and reach your arm behind your back. Half-bind your left arm behind your back and interlace your hands. If you’re unable to clasp your hands, you can use a strap to create more space in your shoulders.
- Shift your left foot closer to your right foot and transfer your weight onto your left leg, rising onto the ball of your right foot.
- With a strong press into your left foot, straighten your left leg and lift your bound right leg into the air.
- Once you feel stable, extend your right leg upward toward the ceiling.
- Remain in this position, focusing on your breath, for five breaths before repeating the sequence on the other side.
A variation to try: Move from bound extended side angle, into bird of paradise, back down into bound half moon.
3. Wheel pose (Urdhva Dhanurasana)
Wheel pose is an energizing posture that opens the front line of your body, from your shoulders, chest, and abdomen through your hip flexors and quadriceps, according to Hirsch.
“Urdhva Dhanurasana supports better posture as it opens your heart and may improve lung capacity as it expands the space in the front line,” she says.
Urdhva Dhanurasana takes shoulder strength and flexibility training, as well as good wrist mobility, so you need to build those up before attempting this pose.
“Start by trying [wheel pose] against a wall, by placing your arms overhead and pretending the wall behind you is the floor in full wheel. If you feel spacious and supported, then try it on the floor,” Hirsch recommends.
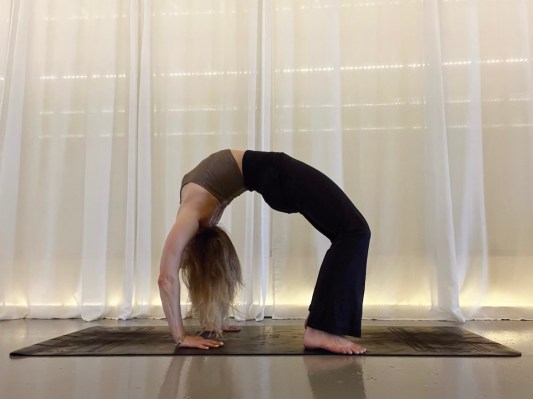
- Start by lying on your back.
- Plant your feet on the ground, hip-distance apart and as close to your glutes as possible.
- Extend your arms overhead and place your hands next to your ears, fingers pointing toward your body.
- Begin to press firmly into your hands and feet, lifting your body until you come onto the crown of your head.
- Engage your core and press even more firmly into your hands and feet as you lift your head and attempt to straighten your arms. Keep your feet pointing forward and your knees hip-distance apart.
- Similar to bridge pose, there’s a subtle internal rotation in your legs, with your inner thighs rotating toward the ground.
- Once you’re up, focus on straightening your arms fully.
- Then, press your chest back through your arms. If possible, walk your hands toward your feet, trusting the strength of your legs.
- Hold this position for five breaths, then slowly lower down. Repeat the sequence two more times.
A variation to try: Lift one leg at a time, then lift one arm at a time. “It’s a great way to continue to build strength and endurance in this posture,” Hirsch says.
4. Crow pose (Kakasana)
Crow pose, a great arm balance pose, strengthens your core and upper body while improving flexibility and range of motion in your wrists.
“Kakasana is as much of a mental game as a test of physical strength,” Hirsch says. “You’re ready to give this a go when you’ve built your core strength and feel confident that falling isn’t failing.”
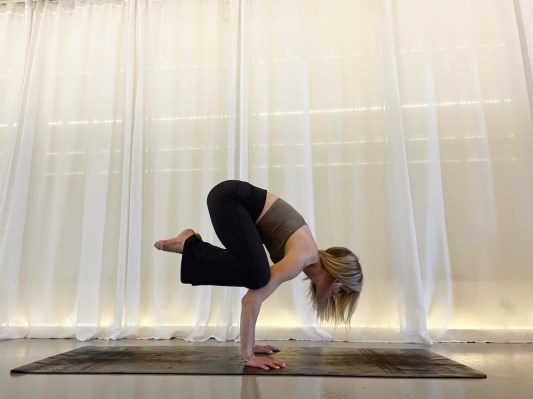
- Start by lowering into a squat position at the top of your mat.
- Place your hands on the ground, shoulder-width apart, with your fingers pointing forward.
- Bring your knees high onto your triceps, bending your elbows to create a shelf for your knees.
- Shift your weight onto your hands by coming high onto the balls of your feet.
- Begin to lift one foot at a time, continuing to shift your weight forward. Focus your gaze forward rather than downward.
- Engage your core muscles, and imagine yourself as a see-saw, shifting your weight forward until your toes naturally lift off the ground.
- Continue pressing into your hands, rounding your spine slightly, and drawing your belly button toward your spine.
- Hold this position for five breaths, then release and return to a standing position to recover.
A variation to try: Get into crane pose (Bakasana) by straightening your arms and bringing your knees closer to your armpits.
Headstand (Sirsasana)
Sirsasana is a stress-relieving inversion posture.
“It relaxes the mind as your hips are higher than your heart, which also increases blood flow to the brain, which may improve mental focus,” Hirsch says. “Sirsasana builds core strength and upper-body strength and also stimulates the pituitary glands.”
The headstand requires you to build both physical and mental strength.
“You need upper-body and core strength physically, and a bit of fearlessness mentally,” Hirsch says. “It can be scary taking your feet off the ground and above your head, but again, falling isn’t failing, and you learn every time.”
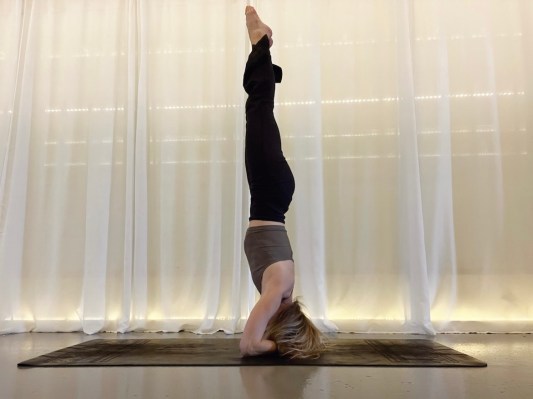
- Start in a tabletop position on your hands and knees.
- Lower your forearms to the ground, interlace your fingers, and tuck your pinky fingers inside to stabilize your hands on the mat. Keep your elbows shoulder-width apart, forming an equilateral triangle with your arms.
- Rest the crown of your head on the ground, clasping your palms around your head.
- Press firmly into your forearms as you tuck your toes and lift your knees off the mat.
- Walk your feet closer to your arms and head, coming into dolphin pose.
- Continue walking your feet forward to bring your hips over your shoulders. If needed, bend your knees to create more space if your hips feel tight.
- Draw one knee into your chest while shifting more weight into your forearms. Avoid placing pressure on your head and neck.
- Engage your core by drawing your belly button toward your spine as you slowly bring your second knee into your chest.
- Gradually straighten your legs, stacking your ankles over your hips and your hips over your shoulders.
- Squeeze your thighs together and press your feet toward the ceiling.
- Hold this pose for ten breaths, then lower down slowly to build strength.
- Rest in child’s pose for five breaths after each inversion.
A variation to try: You can start to make fun shapes with your legs, bringing them out wide into a straddle or taking them into the splits, Hirsch says.
“I like to tell my students, ‘every layer matters and every layer counts.'” —Nicole Wood, master trainer
How to know when you’re ready for intermediate yoga poses
Intermediate yoga poses typically have multiple steps that need to be performed before finally entering the pose.
“Think of each step as a progression,” says Nicole Wood, master trainer with YogaSix. “Once you’ve nailed one of the steps, then you’re ready for the next step, and so on until you’re finally able to do the pose.”
For example, someone might be able to lift just one foot when trying to enter crow pose, and eventually, they’ll be able to lift both feet with time and practice. And to enter bird of paradise, you should be able to successfully take a full bind in extended side angle before stepping up and trying to lift the leg to enter bird of paradise.
“I like to tell my students, ‘every layer matters and every layer counts,'” Wood says.
FAQ
1. How long does it take to become intermediate in yoga?
It depends on many different factors, including the style of yoga you practice, how often you practice, and your anatomy. For starters, there are so many yoga poses, and they all have different intentions.
“Poses can have a strengthening aspect, or they can lengthen or challenge balance. Depending on what intermediate pose you’re trying to accomplish, your yoga practice should help complement and facilitate the intentions of the pose you’re trying to get into,” Wood says.
For example, the splits are a huge stretch for your legs and hips, so you’d need to focus on stretching the lower body. Wheel pose, on the other hand, requires strength so you’d want to work on building upper- and lower-body strength.
How often someone practices also plays a role.
“A student who practices a couple of times a week versus a student who practices a couple of times in one day could look very different on the mat. It also depends on whether a student has had a consistent yoga practice for multiple years versus someone newer,” Wood says.
Because bones don’t move, a person may never get into an intermediate pose based on their anatomy.
“When I was in teacher training, I had to choose a pose that I was unable to do and practice working towards it. I worked on preparing my body for the pose a couple of times a week and after 10 months I was still unable to do the pose,” Wood says.
2. Is intermediate yoga hard?
“I don’t think yoga is easy, and I have been practicing for almost 15 years,” Wood says. A beginner’s yoga class is challenging—it takes strength and effort to do most yoga poses.
How often a person practices yoga within one day or one week will reflect how fast they progress toward a more intermediate practice.
“If someone is doing tons of restorative yoga where they basically take a nap, that isn’t going to progress them toward more advanced poses, so the style of yoga matters,” Wood says.
3. Can a beginner do intermediate yoga?
Yes, but you’ll want to level up with the help of an experienced and attentive yoga teacher.
“A good yoga teacher will offer layers, modifications and the utilization of props for more advanced poses so each student is able to find the ‘perfect pose’ for their body,” Wood says.
As far as safety goes, listening to your body and intuition is extremely important.
“If you ever feel pain or are uncertain, back off. It’s important to listen to the teacher as well and to take each progression slowly,” Wood says.
Source: Well and Good