

It’s easy to think of mountain pose in yoga as a moment to take a break. You’re just standing there on your two feet after all, right?
Actually, it’s a foundational pose that can set the direction for the rest of your flow. “Mountain pose is really the beginning of all poses of yoga,” says Lorenza Pintar, an instructor at bodē yoga studio in New York City. “We call it ‘mountain’ because we embody steadiness and stability. It really is the embodiment of [a] sense of groundedness and expansion.”
Called “Tadasana” in Sanskrit, mountain pose may look very simple, but if you do it right, you’ll feel it very deeply. “In a sense, it’s the ultimate position,” Pintar says.
In This Article
Experts In This Article
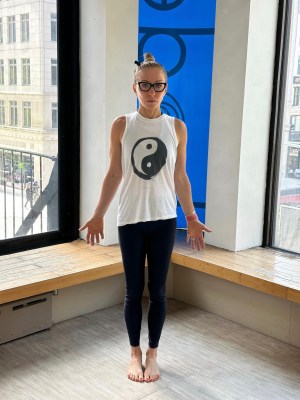
How to do mountain pose with perfect form

- Stand with your feet together, distributing your weight throughout your feet with your toes spread out on the floor. Your knees should be straight, but not locked.
- Find a neutral position in your trunk by aligning your shoulders over your pelvis and lengthening your spine with your tailbone pointed toward the ground. Your core should be activated.
- Turn your palms to face forward.
- Allow your breath to flow naturally as you focus inward. “Observe the breath, observe the gaze, observe the mind,” Pintar says.
Pintar likes to relax her hands and arms, letting them fall naturally. “It’s better for breathing, from my personal experience, because there’s no strain on the upper body or shoulders,” she says.
Which muscles are you working?
Although no muscles should be straining in this pose, a number of them are activated. You might feel your calves, quads, hamstrings, inner thighs, and glutes gently energized. Your core, including your abs, will also engage to support your spine in proper alignment. If you rotate your arms or hold them overhead (more on that, below), your shoulders will get some work, too.
Related Stories
The biggest benefits you’ll get out of mountain pose
1. You’ll feel more present
Mountain pose balances the energies of grounding down into the earth and reaching up to the sky, according to Sabrina Washington, an instructor with CorePower Yoga. “It’s this really wonderful blending of grounding as well as feeling uplifted,” she says. “You can be very present in the pose since you are sort of that middle point between up and down.”
Without any complicated coordination or major balance challenge involved, you have the space to really focus inward. Washington suggests using the time to ask yourself, “Okay, what are my feet doing? Do I feel fully grounded? Are my inner thighs engaged? What’s my tailbone doing? What’s my back doing?” By taking stock, you can set the groundwork for a strong yoga flow.
2. You’ll soak up the benefits of the previous pose
Mountain pose is often a transition between asanas, so it can give you a moment to soak up the benefits of the one you just did before moving into the next.
“It’s a very clarifying moment,” says Pintar, who adds that it’s one of her favorite foundational yoga poses for this reason. Reflect on how your body is responding, like whether your chest feels more open or your hamstrings feel longer.
3. You’ll watch your posture improve
You don’t need to do extreme backbends to help fix a slouching habit. Pintar points out that just finding a tall, neutral spine through mountain pose can help you build a better alignment. “This is a nice way to correct posture without strain,” she says.
4. You’ll br prepared for stronger balances
By finding your footing when you have both feet on the ground in mountain pose, you’re better prepared to move on to more challenging balances. Take the time you need to feel steady and stable before moving into something like dancer’s pose. “It’s a great foundation to work from,” Washington says.
“Mountain pose is really the beginning of all poses of yoga. We call it ‘mountain’ because we embody steadiness and stability. It really is the embodiment of [a] sense of groundedness and expansion.” —Lorenza Pintar, yoga instructor
Variations to try
Despite the simplicity of this posture, there are a few options for how you can express it. In addition to whether you let your arms relax or turn your palms forward, here are two variations you might see in a yoga class.
1. Feet apart with a block in between
Some people have a hard time balancing with their feet together, or it simply feels uncomfortable. Washington says you can get similar benefits from allowing your feet to be hip-width distance apart but taking advantage of a block.
“You can squeeze a yoga block in between your thighs to feel more inner thigh engagement and more stability,” she says.
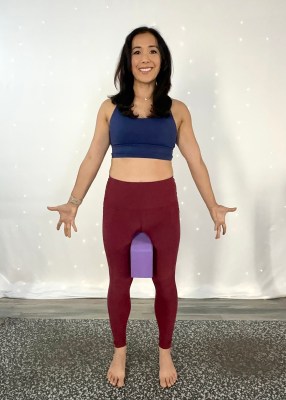
- Place a yoga block in between your thighs.
- Stand with your feet as close together as possible, distributing your weight throughout your feet with your toes spread out on the floor. Your knees should be straight, but not locked.
- Find a neutral position in your trunk by aligning your shoulders over your pelvis and lengthening your spine with your tailbone pointed toward the ground. Your core should be activated.
- Turn your palms to face forward.
- Allow your breath to flow naturally as you focus inward.
2. Hands up
At CorePower Yoga, mountain pose is typically done with your hands reaching up rather than down by the sides. “If you look at the Sanskrit of mountain pose, which is ‘Tadasana,’ there is debate on whether or not the ‘Tada’ means mountain or if it actually means palm tree,” Washington says.
If you’re team palm tree, you’ll want to stretch your arms straight up with your shoulders down while extending the fingers wide and rotating the pinkies inwards so the palms face the back. This variation will be a lot more energizing, rather than a quiet, calming moment.
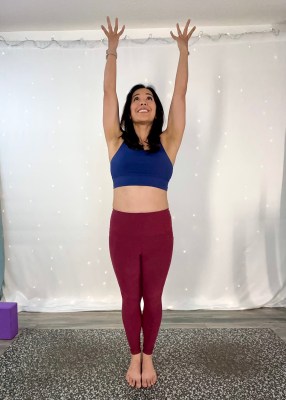
- Stand with your feet as close together as possible, distributing your weight throughout your feet with your toes spread out on the floor. Your knees should be straight, but not locked.
- Find a neutral position in your trunk by aligning your shoulders over your pelvis and lengthening your spine with your tailbone pointed toward the ground. Your core should be activated.
- Reach your arms straight up toward the sky, your biceps by your ears.
- Allow your breath to flow naturally as you focus inward.
Common form mistakes—and how to avoid them
There are a few ways that people miss out on the benefits they could get out of mountain pose. Here’s what you may be doing wrong and how to fix it.
1. Tipping forward on your toes
Because it’s so simple, many people feel like they need to do more in mountain pose, so they tip forward onto their toes, according to Pintar. But you actually want to keep your weight evenly distributed throughout your feet from your toes to your heels.
2. Gripping your toes
When we start to lose our balance, we have a tendency to grip our toes. But Pintar suggests trying to keep them relaxed. If anything, spread them out wide on the ground.
“I always observe people’s feet because it tells me where their mind is,” she says. “If I see the person really has a hard time relaxing the toes, that tells me the balance is not there.”
3. Letting your shoulders drift up
If you’re doing the arms-raised version of mountain pose, it’s easy to let your shoulders creep up towards your ears. “We’re tense and we’re holding on to the stress of the day,” Washington says.
She suggests thinking of squeezing your shoulder blades toward one another or just pulling them down.
4. Just standing there
Because this is such a simple pose, it’s easy to hit without paying much attention to it. But a successful mountain pose is one that’s really engaged.
“Squeeze your legs together like a powerful tree trunk and root your feet down into the earth so you feel like this grounded, strong tree,” Washington says. “You want it to feel comfortable, but there is some muscle activation.”
Beginner tips for mountain pose
Mountain pose isn’t one of those asanas you should attempt to ace. “Try not to ‘perform’ it too much,” Pintar says. “Otherwise, it becomes stressful.” Remember, it’s a meditative moment. Relax your breath and let it flow naturally.
“Really take the moment to integrate what came before and to go back to the breath,” she says. “That will naturally prepare you [for] the next [asana] because you’re present and you’re not overthinking the next thing to do.”
FAQ
1. How long should you hold mountain pose?
The first time you do mountain pose during a yoga flow, Washington recommends holding it for five breaths. “Just really feel how you feel and what your body’s doing that day,” she says.
When you return to the pose, you can flow through it for just one breath, before moving into whatever comes next.
2. Do your arms go up or down in mountain pose?
Although most yoga teachers will cue mountain pose with the arms down, others will ask for the arms to reach high. There is no one “right” way, according to Washington—it just depends on preference and if you want a more grounding (arms down) or energizing (arms up) position.
Source: Well and Good